OSH
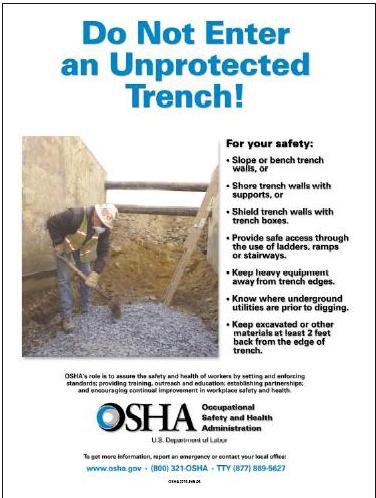
In 1995 Occupational Safety and Health (OSH) set out an Approved Code of Practice for Excavation and Shafts for Foundations. This approved code of practice consists of two major parts.
Part One covers trenches and excavations. Fatal accident records relating to trench collapses highlight the need for employees to be protected against such failures. With proper precautions, accidents and injuries can be avoided. This section also includes recommendations intended to assist engineers who may be involved in the design of shoring.
Part Two covers shafts, drives and the construction of large-diameter shafts for piling, where persons enter for inspection or other work purposes.
Click here to download a .pdf version of the Code (Requires Adobe Reader).
OSH publishes construction bulletins on a regular basis; see:
www.osh.org.nz/order/catalogue
TrenchMate Shield Assembly Procedure
TrenchMate Shield Safe Usage Guidelines
Ensure you understand the loadings & slings required.
Each shield with struts weighs 2.8 tonne. The combined weight of 2 shields is 5.6 tonne. We recommend using a 4 leg sling (13mm chain) with minimum leg lengths of 3 metres and HT bow lifting shackles with a minimum of 7/8 pin rated at 6.5 tonne each. See Herc-Alloy 800 chart for sling selection (below).
Each shield has threaded lifting sockets in the right hand panel. These sockets have a M24 x 3 thread. They are protected by a screw-in plug which must be replaced before using the shield.
In each of these sockets, screw-in fully an eye-bolt rated at 1.8 tonne each.
Attach each leg of the sling to each of these using a leg length of 2.5-3m.
Now you can take the weight of the shield. Knock out the bolts and adjust the struts to the width required. Ensure the bolts are secured adequately. Please Note: there is no need to ever get between the panels whilst doing this.
Once the shields are adjusted to the correct width, the trench shield is ready to be positioned in the trench. If one shield is to be mounted on top of another, complete the following:
Lie them on their sides, top to top and bolt in
connection links (dog-bones) in. Now lift from the top
eyes inside the shields. Never lift or tow from the
struts.
Towing is to be effected from the tow eyes provided on the leading edge of the shield.
For a single shield use a 2 legged sling; for doubled-up shields use a 4 legged sling. Leg length of sling should always be at least a metre more than the set width of the shields.
1.
2.
a
a
a
a
a
3.
a
a
a
4.
5.
6.
7.
8.
9.
This first section addresses assembly procedure for Steel Shields. Please scroll down for Alloy Shield assembly procedure. If you require any assistance, please contact Porter Engineering on (0800) 385 274.
Assembly Procedure: Steel Trench Shields
Assembly Procedure: Alloy Trench Shields
1.
2.
a
a
a
a
3.
a
a
a
4.
5.
6.
7.
8.
9.
Ensure you understand the loadings & slings required.
Each shield with struts weighs up to 1.6 tonne. We recommend using a 4 leg sling (10mm chain) with minimum leg lengths of 3 metres and HT bow lifting shackles with a minimum of 7/8 pin rated at 6.5 tonne each. See Herc-Alloy 800 chart for sling selection (below).
Each shield has threaded lifting sockets in the right hand panel. These sockets have a M24 x 3 thread. They are protected by a screw-in plug which must be replaced before using the shield.
In each of these sockets, screw-in fully an eye-bolt rated at 1.8 tonne each.
Attach each leg of the sling to each of these using a leg length of 2.5-3m.
Now you can take the weight of the shield. Knock out the bolts and adjust the struts to the width required. Ensure the bolts are secured adequately. Please Note: there is no need to ever get between the panels whilst doing this.
Once the shields are adjusted to the correct width, the trenchshield is ready to be positioned in the trench. Lift from the top eyes inside the shields. Never lift or tow from the struts.
Towing is to be effected from the tow eyes provided on the leading edge of the shield.
Alloy shields use 2 legged slings. Leg length of sling should always be at least a metre more than the set width of the shields.
This page contains some general safety information provided by OSH. To obtain a copy of TrenchMate Shield Safe Usage Guidelines, or for more detailed enquiries, please email Porter Engineering: [email protected] or phone (0800) 385 274.
Other Resources
www.TrenchSafety.org
Trench Safety.org is a ten-lesson tutorial based on the latest OSHA requirements for construction excavation safety. Its purpose is to teach safe trenching practices, in a modern format, taking advantage of the multimedia and hyper-linking capabilities of the World Wide Web.
Trench Safety Glossary
A Glossary of terms used in connection with safe trenching
U.S. Department of Labor Occupational Safety & Health Administration (OSHA)
OSHA has published considerable information on safe trenching practices. Click here to go to the OSHA Trenching and Excavation page.
Trenching and Excavation. Construction Safety Council.
Mickle, J.L. "The Mechanics of A Trench Cave-In." Agri-book Magazine/Drainage Contractor 8-9(1991).
Stanevich, R.L. and Middleton, D.C. "An Exploratory Analysis of Excavation Cave-in Fatalities." Professional Safety (1988, February): 24-27.

To view .pdf file, click the image above (requires Adobe Reader). To save to your computer, right-click the image and choose "Save Target As ..." or "Save Link As ..."
Maximum safe working loads (SWL) in tonnes (t) of 1000 kg:
2 or 4 Leg Slings (Straight Sling)
5.5t 4.5t 3.2t
9.4t 7.6t 5.4t


